Author Archives for simplifiedbystacie

Simply Homemade: Lazy Dazy Cake

This week’s post is for my dad since he’s the man of the hour who celebrated his birthday earlier this week. Me posting this recipe is a true testament to how loved he is because that love had to outdo my extreme dislike for the star ingredient of this cake…coconut. Don’t get me wrong here, I want to love coconut..I really do! But there is just something about the texture that rubs me the wrong way when a dish has too much coconut. Girl Scout caramel delight cookies with a sprinkling of coconut on top? Put me down for a couple boxes! Perfectly delicious cake with a heaping layer of coconut glaze on top? Can’t handle it even as bad as I want to. I always thought I would outgrow this but, unfortunately, my taste buds have not succeeded thus far. I have many genetic traits that I can thank my dad for but he apparently chose to skip the coconut-loving-gene when I came around. Hopefully genetics was kinder to you and the picture makes your taste buds water for some sweet satisfaction!

Turns out, my dad’s mom made this cake and called it Lazy Dazy Cake and my mom’s mom made it too only she called it Bird’s Nest Cake. Regardless of the name, it was apparently a favored cake back in the day. It only needs a few staple ingredients and it was always a hit with people because the coconut glaze was the ‘cherry on top’ and just that little bit unexpected and different. Speaking of unexpected, this year for my dad’s birthday, I “supervised” two of my baking-inclined sisters and took pictures while they concocted this year’s birthday dessert. It brought back so many fun memories for all of us. We would always have my dad pick a dessert on his birthday morning or we’d choose to surprise him. Then he’d inevitably disappear to go work outside on/around the farm all day. What a way to celebrate your birthday, huh? Such is the life of a farmer…it’s not for the faint of heart! By the time he would finally come inside for dinner we would have his dessert ready and waiting for him. Unfortunately for us, dad never truly mastered the patience factor and usually found a way to figure out what we were making midway through the day. It never stopped us from trying to wow him though!

From this lazy dazy cake to balls of joy (Christmas candy made by my family and named by my laughter-loving dad) to German chocolate cake and every dessert in between, Dad is a coconut lover and has a sweet tooth through and through. Luckily for him, I am equally happy to forego my taste testing of all coconut based treats so he can have an extra serving 😉 Such a good daughter, aren’t I? Seriously though, I hope you share the birthday boy’s love of coconut because this recipe really is a fantastic one and not seen all that commonly anymore. Also, I promise to continue sharing the others of his favorite coconut themed recipes even though I’ll have to rely on him for taste testing and we’ll all have to take his word for it on the deliciousness factor. So please try this recipe out the next time you’ve got a coconut craving and be sure to cut the first piece as a circle out of the middle in honor of the birthday boy and his comedic cutting tendencies!

Lazy Dazy Cake

  • Servings: Approximately 15
  • Print

This vanilla spongecake is topped with a coconut glaze that's caramlized to perfection!

Ingredients

-4 eggs

-2 cups white sugar

-2 cups flour

-2 teaspoons baking powder

-1/2 teaspoon salt

-2 teaspoons vanilla extract

-3 tablespoons butter

-1 cup milk

-1 cup brown sugar

-1 1/2 cups sweetened flaked coconut

-7 tablespoons butter

-4 tablespoons milk

-Vanilla ice cream (to serve with cake)

Directions

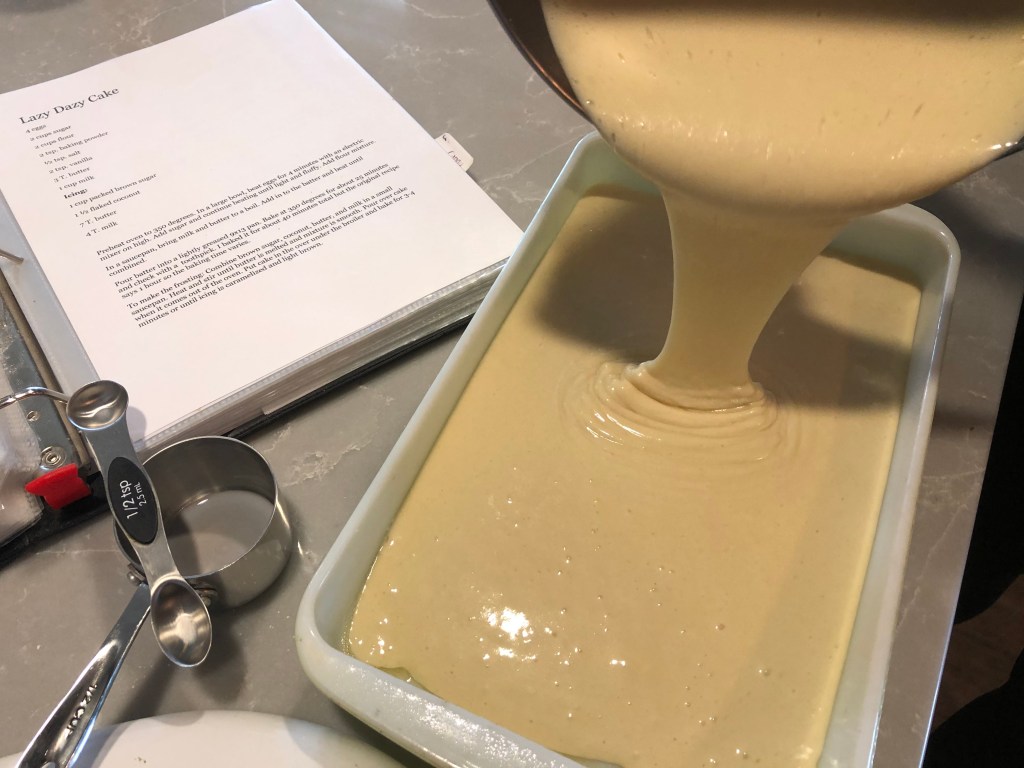
1) Preheat oven to 350 degrees. Spray 9×13 pan and set aside.

2) In large bowl or kitchenaid bowl, beat eggs for 4 minutes on high.

3) Add sugar to eggs and continue beating until fluffy (about another 3 minutes).

4) Add flour, baking powder, salt, and vanilla to sugar and egg mixture and mix on low to combine.

5) In small bowl, combine 3 tablespoons butter and 1 cup milk and heat until boiling (about 3 minutes in a microwave).

6) Add milk mixture to large bowl of batter mixture and mix until combined.

7) Pour batter into the 9×13 pan and bake at 350 degrees for approximately 40 minutes, checking occasionally by poking with a toothpick until it comes out clean.

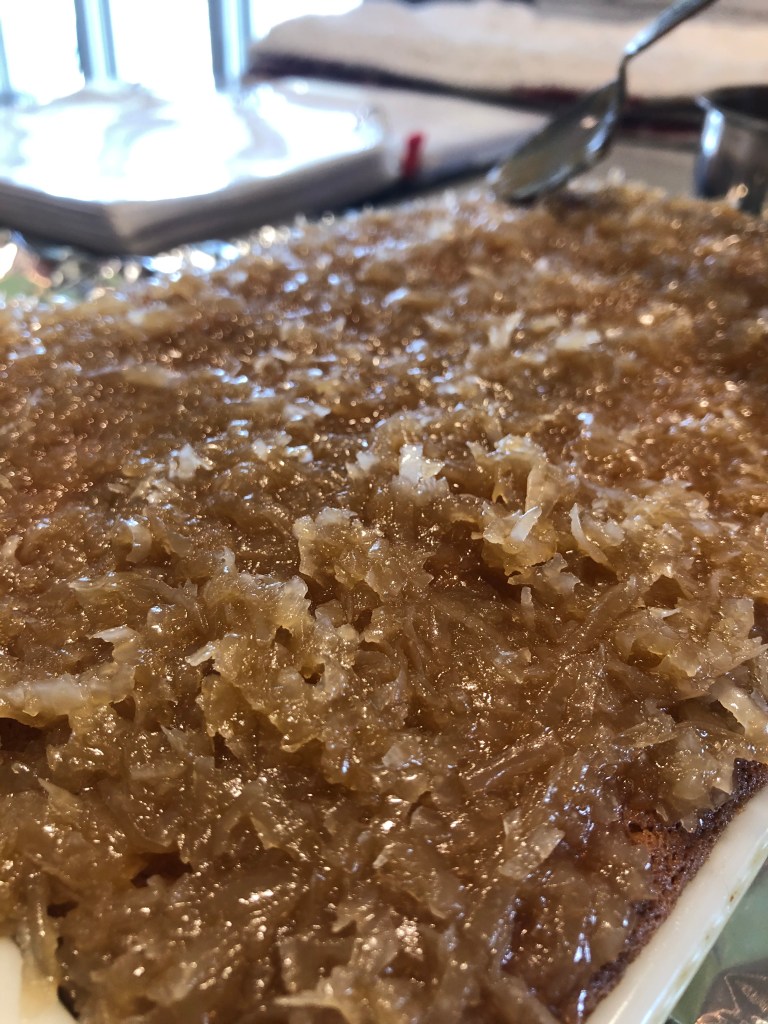
8) After cake has been in the oven for about 30 minutes, start putting the glaze together by combining the brown sugar, coconut, 7 tablespoons butter, and 4 tablespoon milk into a small saucepan.

9) Heat saucepan on medium heat and stir until butter is melted and mixture is smooth.

10) Remove cake from the oven and make sure oven is set to broil.

11) Pour glaze over the top of the cake and put in oven to broil for approx 3-4 minutes until glaze is caramelized and some of the coconut is light brown.

12) Cool and serve with vanilla ice cream!

Staple pantry ingredients..check!
Mix it…mix it REAL good!
Fluffy and airy is the key to this cake batter.
Pouring in the yum!
Check out this glaze before it’s popped into the oven! I don’t even like coconut and I want to swipe a taste!!!
Final product…all that’s missing is a triangle cut out of the middle with a candle on top!

Simply Homemade: Caramel Apple Pizza

Get ready for it..this is another post with a fabulous idea for using the season’s fresh produce! Lucky for us, we have fabulous neighbors who are always offering to share. From yard care tips to borrowed snowblower/shovels/wheelbarrows to heads up on delivered items while we are away from home to shared produce from their own garden and too many other daily blessings to list, we are truly fortunate to live next door! In regards to today’s post, those same neighbors of ours just so happen to have not one, not two, but multiple apple trees in their yard. Which means…you guessed it…we get to help take some of the extra apples off their hands!

Apples are fantastic because you can pretty much always find a way to enjoy them. Too sour? Use those for an apple crisp and top with that delicious cinnamon sugary crumble! Too sweet or mushy for your liking? Helloooo applesauce! Too many bruised spots? Cut it up and use the good parts in a salad! Crisp, tart, sweet, and perfect? Wash it and eat it plain! They come in so many colors and different varieties so they are a super versatile ingredient. I was recently gifted some gorgeous green apples by that very same generous neighbor and I’m not sure why but my first thought was that I really wanted to make my mom’s caramel apple pie recipe.

I always loved how pretty her presentation was with it I also just so happen to have a serious weakness for anything with great caramel. While I would love to lie and say that weakness has lessened over time, I will opt for truthfulness and say that Mrs. Richardson’s caramel will probably always be near and dear to my caramel lover heart! Yes, I have a favorite brand and am a bit of a caramel snob…what of it? For anyone who hasn’t tried that version yet do yourself a favor and seek it out in the very near future. Just TRY to ever enjoy a banana split or this decadent dessert with anything else after you’ve had Mrs. Richardson’s. I dare you! You’re welcome in advance!

But, I digress, back to the recipe! This recipe is reminiscent of childhood in so many ways and I personally think it is a fantastic way for adults to enjoy a more mature version of caramel apples. Kids love it too because it is way less overwhelming to eat a slice of this than try to figure out how to begin with an apple half the size of their head. Also, it’s hardly even a dessert with all that fruit on top so surely mom won’t mind if they take another piece or two, right? 😉 My mom made this recipe more times than I can remember and I honestly don’t ever remember it lasting long regardless of what function she brought it to or what event it was made for. That’s a great problem to have seeing as this isn’t a dessert made for leftovers. Sliced apples are definitely best devoured the day of!

If you know my mom, you know her version of this dish is ridiculously perfect with the apples slices evenly sliced and beautifully arranged and the caramel drizzled just so. As you can see from the pictures below, I hate to disappoint so I didn’t even try to compare to that. I opted to go more for the rustic look. I honestly think the taste is bound to be incredible if you decide to thinly chop or slice or dice the apples and might even be ok if you use your own favorite caramel sauce on top instead of Mrs. Richardson’s or with store bought apples instead of home grown. I will never know but I trust all of you to try it however you fancy! Enjoy 🙂


Caramel Apple Pizza

  • Servings: Approximately 8
  • Print

This is a fantastic Fall dessert recipe and can be made any number of ways depending on the pan and presentation of your choice!


Ingredients

-1/2 cup butter (1 stick), softened

-1/4 cup powdered sugar

-1 cup flour

-8 ounce package cream cheese, softened

-1/3 cup brown sugar

-1/2 teaspoon vanilla extract

-2 or 3 granny smith apples, sliced thinly

-1 can sprite

-3 tablespoons Mrs. Richardson’s Butterscotch caramel topping

-1/4 cup pecan pieces


Directions

1) Preheat oven to 325 degrees.

2) Mix flour and powdered sugar in medium size mixing bowl, add in softened butter & mix well (I prefer to do this using my hands).

3) Spray pan (9″ round or larger) and place crust mixture just mixture together in. Spread evenly all the way to the edge of the pan.

4) Bake crust for 10-15 minutes until it appears very lightly browned on top. Remove to cool.

5) While crust is baking, pour can of sprite into bowl for apples to go in as they’re sliced.

6) Thinly slice applies (approx 1/8-1/4 inch width or finely chop) and put directly into sprite filled bowl to coat (this keeps them from browning).

7) When all apples are sliced, set the bowl of them in the sprite aside for 5-10 minutes.

8) Mix softened cream cheese, brown sugar, and vanilla well in small bowl.

9) Spread cream cheese mixture evenly over cooled crust.

10) Remove apples slices from sprite mixture and pat dry with paper towel then arrange on top of the cream cheese layer.

11) Heat a couple tablespoons of the caramel topping in a small bowl and use a spoon or fork to slowly drizzle caramel over apple layer.

12) Sprinkle pecan pieces on top before slicing and serving!


Beginnings of YUM…
I used a small round pan for presentation but it works great in a larger pan too!
Hello FALL colors and flavors!
Half pecans, half pecan-less for those of you opposed to the extra crunch factor!

Simply Homemade: Chimichurri Sauce

Holy moly guacamole mac & cheese, how are kids starting back to school already? I need to hurry up and get some more summertime family favorite recipes posted because, at this rate, it will be back to crockpot season in the blink of an eye!!! I thought this week would be a great one to introduce you all to an amazingly fresh sauce called chimichurri.

It’s perfect for summer because it uses fresh herbs (flat leaf Italian parsley, cilantro, and oregano) and really pops with the addition of shallot, fresh lemon juice, and garlic. This sauce screams summer because it a gorgeous bright green color and is absolute perfection as a dip for those juicy steaks you’re planning on grilling. And, you can make a big batch and freeze it so you can have these fabulous summer flavors all year long! Bonus!!!

My family has done prime rib for a big holiday meal for years now and this chimichurri sauce is no longer optional. When we have prime rib, we will have chimichurri! Everyone knows and loves a good creamy horseradish sauce with prime rib but, trust me here guys, give this alternative green sauce a try – you won’t be disappointed! It enhances the flavor of the meat and goes well on simple things like grilled steaks or complex things like shredded beef rice bowls. However you add this layer of flavor, it’s sure to give your taste buds a very happy wake up call.

For the past few years, my sister(s) and I have been in charge of concocting this sauce for the holiday meal. Yes, concoct is the correct word. Every year we remember the ingredients and fudge the amounts. Every year we end up mixing, tasting, adding, mixing, tasting on repeat for about 10 minutes straight. And, every year without fail, we proclaim that the batch just concocted is definitely the best one yet! Since we have apparently perfected this method and now all crave it throughout the year, I thought it was time to share the goodness. Especially since people near and dear to me are so generous to share the goodness of their gardens so this recipe is basically free to make 😉 Fresh jalapeño from one sister! Yes please! Fresh flat leaf italian parsley from another sister? I’ll take it! Pantry staple ingredients like vegetable oil, garlic, and seasonings? Check, check, checkity-check! Next year’s garden wish list to include these herbs and jalapeños specially for this recipe? Big check!

Please keep the concoction story in mind as you attempt to concoct your own version, it will likely need some tampering with to get it just right. If your lemon is ultra juicy, your shallot is a dwarf or the size of a fist, etc it will affect this end result. Taste test as you go and add what you love or what isn’t shining through. This guideline of a recipe should get you as close as possible to deliciousness 😉 Enjoy this perfect summertime sauce!!!

Chimichurri Sauce

  • Servings: Approximately 6-8
  • Print

You have to give this bright and fresh sauce a try the next time you prepare any sort of beef dish - it goes especially well with steak and prime rib!

Ingredients

-1/2 cup fresh cilantro (stems cut off and removed)

-1/2 cup fresh flat leaf Italian parsley (stems cut off and removed)

-2 tablespoons fresh oregano (just the leaves)

-1/2 shallot

-1/2 jalepeno (seeds removed unless you like it HOT!)

-4 teaspoons minced garlic

-1/4 cup red wine vinegar

-1/2 teaspoon salt

-3/4 cup vegetable oil

-Juice from 1 lemon

-1/4 teaspoon red pepper flakes

-1/4 teaspoon black pepper

Directions

  1. Wash and prep fresh herbs, shallot, and jalapeño then put those and garlic into blender and pulse until chopped and combined.
  2. Add in remaining ingredients (liquids and seasonings) and blend everything together well.
  3. Refrigerate until ready to serve, stir, and enjoy as a delicious, bright, healthy sauce on steak, shredded beef, prime rib, etc!

[/recipe-directions}