Recipe Posts

Simply Homemade: Italian Pressed Sandwiches

I know what you’re thinking..a sandwich recipe post? Really? Trust me, this one is worth stopping your scrolling for! This is a sandwich that I tried for the first time thanks to one of my sisters and I knew, instantaneously, it would be a forever-favorite. Yes, it’s that good.

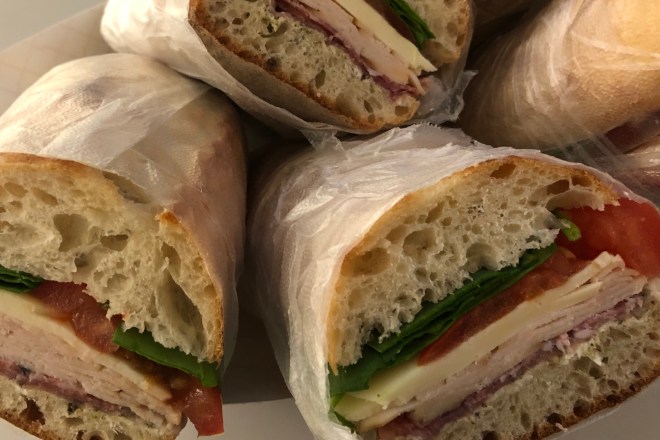
Let’s break it down, shall we? It’s got everything I love in every bite..delicious bread, a little smooth, a little crunch, and a whole lotta Italian flavors exploding my (and soon-to-be your) taste buds! As with any sandwich, it’s completely customizable to your taste preferences or fridge content restrictions. But, I won’t lie, the pictures and description to follow are my absolute jam! Let’s get real, any carb-lover knows that the basis of any respectable sandwich is a bomb.com bread. For this particular sandwich I don’t think it gets much better than a good quality ciabatta. Next up, the spread! My sister introduced this sandwich with a thin smear of cream cheese to add a creamy, light, and fresh element that cuts out some of the dryness. And it wouldn’t be an Italian sandwich if pesto wasn’t the main part of the spread, am I right? If you’re an olive lover like me, an olive tapenade spread completes the spread trifecta. Ok, bread and spread…check and check!

Now for the fun part! Hellooooooooo toppings! After some tried and true taste testing, the combination of proteins I like the best are a little smoked turkey lunchmeat, a little prosciutto, and a little peppered salami. Indulgent? You betcha. Little pricey for a strict meal plan? Ok, you got me there…you maybe need to repurpose those in additional meal plans to justify the extra grocery cost but totally worth it for the smoke, the salt, and the pepper. Next up, cheese please! My personal preference is sliced provolone but, again, feel free to deviate.

Finally, the fluff stuff! Don’t get me wrong, I don’t mean this is fluff as in unnecessary. I mean this adds some fluff to the sandwich; hence the pressed part of the recipe title where we smash this down to make it a manageable eating proportion. What self-respecting sandwich would be complete without some sort of greens for a crunch factor? Not this one! I love spinach but you could also go for peppery arugula or a simple spring mix. Roasted red peppers, cucumber slices, tomato slices, banana pepper rings, or red onion slices are phenomenal additions but, if not to your liking, no worries a’tall! Whatever choices you choose, don’t be afraid to stack up those layers.

Sandwiches, are you ready? Get wrapped, get set, then get devoured! If you can stand waiting a couple hours before consuming, it’s highly recommended to wrap this sandwich tightly in Saran Wrap and refrigerate with a little weight on top of it to press it down. Just a couple pounds is perfect (ex: cast iron skillet set on top). Doing this allows all the flavors to meld together and, bonus, makes this monstrously overstuffed sandwich now a manageable bite. You, by no means, have to do this step and you can certainly just tightly wrap without the weight on top if you’d rather. The convenience factor of having it wrapped is also that you can easily slice it into serving size! The refrigeration period really does enhance the flavors as it rests longer but it starts out pretty delicious already so can’t go wrong here if ye of little patience can’t wait to enjoy it later.

Whether you’re making single serving sammies or a party sub; this packs up extremely well for that picnic or hike or family road trip you have been meaning to go on. And they last a couple days after being wrapped and tossed in the fridge so they are an excellent make-ahead work lunch option. Remember that sandwiches don’t have to be boring, step outside your PB£J box and live a little with this recipe 😉 Big thank you, as always, for reading and sharing with all your food-loving friends too!!!


Italian Pressed Sandwiches

  • Servings: Approximately 1-4
  • Print

Deliciously satisfying sandwich sure to impress and quench any Italian cravings!


Ingredients

-Ciabatta roll or loaf, halved lengthwise -Cream cheese -Pesto -Olive tapenade -Roasted red peppers and/or banana pepper rings -Tomato slices -Spinach -Provolone sliced cheese -Smoked turkey lunchmeat -Prosciutto -Peppered salami slices

Directions


1) Spread a thin layer of cream cheese on half of the bread (making sure a large piece of Saran Wrap is underneath the bread for easy wrapping later) then top with a thin layer of pesto and olive tapenade.
2) Layer on each of your desired veggie toppings next.
3) Place the slices of cheese on top of the veggies.
4) Add the proteins in layers then top with the other half of the bread.
5) Wrap entire sandwich with the sides of the Saran Wrap so it’s tightly wrapped. Add more wrap as needed.
6) Refrigerate for at least 6 hours is possible and place weight of something kind (cast iron skillet works great) directly on top of the wrapped sandwich during refrigeration.
7) Remove when ready to eat, slice, and serve!

Simply Homemade: Fresh Vegetable Pizza

This week, I’m re-introducing a fantastic recipe to many of you who have forgotten about it: fresh vegetable pizza! This used to be much more commonly seen at at various parties, food days, and group meals. Not sure why that no longer seems to be the case because this recipe is as delicious and versatile as ever! Appetizer cut into smaller pieces? Sure! Side dish in lieu of a salad and/or bread? Absolutely! Modern take on a veggie tray with ranch dressing? You betcha!

For those of you who somehow aren‘t familiar with this recipe in one or another, get ready to add another simple winner of a dish to your repertoire. It’s as easy as a quick bake of rolled out crescent rolls then spreading a homemade dip, then chopped veggies, and then cheese on top. It’s a great way to get people to eat veggies because they’re disguised and include carbs and cheese; who can resist that? This is a useful summer option when you have some of your own fresh garden veggies to contribute. But, it’s also equally easy any time of year because there are no rules with which veggies you use. Feel free to customize with what’s available and/or fresh (or even what is on sale that week!).

For those of you familiar with this recipe, you know this is is incredibly easy to customize to your group’s liking. Don’t like radishes? Leave them off or put them on the adult’s half of the pizza and leave off the kid’s half! Prefer to spice it up? Add some chopped jalapeños and use pepper jack cheese on top. Have OCD and can’t handle the jumble of chopped veggies haphazardly spread on top? Thinly slice the veggies instead and arrange in lines or expanding circles or whatever you prefer! Making it for/with picky children? Unroll the crescent rolls but leave them as flattened triangles instead of combining into one large sheet or use cookie cutters or biscuit cutters to make into shapes. Bake and then let each kid top their own piece with their fave toppings! If making this for a special occasion or holiday use the colors or shapes of the veggies to make a design!

As you can tell from the pictures I posted, I love using a wide variety of veggies. My personal OCD level doesn’t mind the mixed up chopped veggies. It does, however have an issue with too many of the same colors. For example, tomatoes are a must for me but I also love bell peppers so I have to use yellow peppers if I use both those. I’ve even gone so far as to get the mixed radishes and use the purple skinned ones just for more variety! Sometimes I use chive cream cheese or sometimes I top the chopped veggie layer with a sprinkling of fresh chives or green onions. I love that I can change this up every time I make it with different flavors and colors or tailor it to people’s taste preferences. However you choose to prepare this for your next gathering, I hope you love it as much as all the guests there are sure to!!!


Fresh Vegetable Pizza

  • Servings: Approximately 12-15
  • Print

Simple dish that's served as a side or appetizer and sure to please with it's customizability!

Ingredients

-2 (8 ounces each) tubes of crescent rolls

-16 ounces cream cheese, softened (I use half chive cream cheese and half original cream cheese)

-1 (16 ounce) dry ranch packet, less to taste

-4 tablespoons sour cream

-4 cups total assorted chopped veggies (cucumbers, tomatoes, carrots, broccoli, cauliflower, bell peppers, radishes, black olives)

-1 cup shredded cheddar cheese

Directions

1) Spray large pan or cookie sheet and roll out crescent rolls so it’s a sheet of dough ( flat and even with seals pinched closed).

2) Bake according to crescent roll directions (mine was 350 degrees for approx 12 minutes) until light golden brown. Remove from oven and set aside to cool.

3) Mix the softened cream cheese and sour cream and half of the ranch packet together well. Taste and add more ranch seasoning to taste.

4) Spread cream cheese mixture over the cooled crust in an even layer (all the way to the edges).

5) Sprinkle mixed veggies on top of the cream cheese layer so it’s mostly coated.

6) Sprinkle a fine layer of cheese on top of veggie layer, press down very lightly so veggies and cheese “stick” to the cream cheese layer.

7) Chill if not serving right or cut into serving size pieces and serve!

Crust…aka customizable food palette!

Veggies galore! Add, remove, or swap to your heart’s desire!!!

Cheeeeeeeeeese, yes please!

Simply Homemade: Scalloped Potatoes & Ham

What’s more comforting than warm, ooey gooey scalloped potatoes with salty, savory ham sprinkled in and baked to bubbly perfection? Well don’t ask me because this is yet another staple dish that I grew up eating fairly regularly and, in my book, it’s hard to beat.

Ah…the memories associated with this hot dish! I’ll never forget coming home to the delicious aroma of this baking in the oven. Or seeing the heaping helping put on each person’s plate around our table. My mom would always serve this with her homemade apple sauce. And my dad, in true hardworking farmer fashion, would also always pair this with a slice or two of white bread topped with butter and my mom’s homemade strawberry rhubarb jelly. It was so common for neighbors, friends, and family members to join us for meals. Our parent’s house had (and still has to this day) the definition of an open door policy when it comes to sharing meals with those we love.

This dish feeds numerous people and is filling enough even for those who have put in a hard day’s work. As a result, my siblings and I became pretty familiar with helping to prep it by peeling potatoes. As we would stand there peeling at an excruciatingly slow rate our mom peeled a surprising amount using just her kitchen knife. I still cannot fathom how in the world she’s able to cut the potato skin off in such thinly shaved slices; there’s some sort of magic in her knife I swear! Guess the apple fell a little ways from the tree because I, like any self-respecting adult who now spends time in the kitchen, have a favorite vegetable peeler in my utensil caddy that I rely on 😉

I won’t lie, I also prefer to use the slicing attachment on my food processor to uniformly slice the potatoes for this dish but that’s just me (very low patience level and no magic knife skills in sight). One of these days I really need to take a culinary class to hone my knife skills but, until then, I’m thankful for the tools my kitchen offers. Speaking of honing…over the years my family has really experimented with this and found some adaptations that we love and I’m sure you would like as well. My brother’s household found they enjoy this with sausage just as much as with ham. That could be because the sausage we use is also homemade by my amazing parents and it’s the best ever (in my obviously unbiased opinion). For those of you not privy to a hands-down favorite or homemade family sausage, have no fear! A traditional ham, ham steaks, smoked ham, honey baked ham, etc are all delicious! My hubby, kiddo, and I are fans of adding a handful of shredded cheddar cheese into the roux sauce to make an even more decadent version of this recipe. Totally not necessary but just adds a little twist of deliciousness and, let’s be real, adding cheese really never hurt anything 😉

But, I digress… we all know I could go on and on about variations for this recipe just like I have with so many others. Bottom line, whether you use your own magic knife skills, kitchen gadgets/appliances, favorite pork product or variety of cheese, this dish is a winner and is sure to create instant feelings of warmth, comfort, and home!

Scalloped Potatoes & Ham

  • Servings: Approximately 6-8
  • Print

Simple staple meal great for cold weather or when a warm, filling meal is what's needed!

Ingredients

-4 tablespoons butter

-1 small onion, finely chopped

-1 teaspoon parsley flakes

-1 teaspoon chicken soup base

-1 teaspoon salt

-1/2 teaspoon pepper

-1/2 teaspoon dried thyme

-1/4 cup flour

-3 cups milk

-6 cups potatoes, peeled and thinly sliced

-1 1/2 cups ham, chopped

Directions

1) In small saucepan, melt butter over medium heat then add chopped onion and sauté until softened (approx 3 minutes).

2) Add in all seasonings and mix well then add flour and stir until smooth.

3) Gradually add milk to mixture, a little at a time to keep it smooth. Once all milk has been added, bring roux sauce mixture to a boil and stir while cooking for 2 additional minutes so it thickens.

***Can add shredded cheese to the sauce if you prefer a cheesy version!***

4) In large bowl, combine potatoes and ham then pour sauce mixture from saucepan into the bowl and mix everything together.

5) Pour mixture into greased/sprayed 9×13″ pan and cover with aluminum foil.

6) Bake at 375 degrees for approximately 80-90 minutes until potatoes are tender.

Handy dandy peeler and food processor make prepping a breeze!

Mmmm roux sauce meets potatoes and ham!

I mean, come on! You know you want to eat this!!